Thursday, September 26, 2024

Doggie's Halloween!


I can't help myself, even my Halloween cards must be some form of "cute" for me to be happy, lol! So this little doggie from Doggie's Halloween did the "trick"! ha!
I stamped him on 100 Lb Hammermill Cover Copy cardstock (my usual go-to) and coloured him with Copics.  I hand cut a mask for him, so I could proceed to create a background!  I sketched the pumpkins with a Copic liner, then coloured them in with Copics, and then sketched/and/or/coloured in the entire background with Copics as well.  I established where I wanted the moon with a circle mask.  I sketched where I wanted the hills and tombstones.  Then I used some Distress Oxide inks to sponge on some Cracked Pistachio, Twisted Citron and Black Soot to help create the atmosphere - Oh and a wee bit of Iced Spruce for some misty grey.  
I was excited to use my new Halloween Grasses and Trees stencil for the silhouetted trees! I filled them in with the Black Soot.  That stencil is so fun to use and gives the background the added spook it needed! I made them appear backlit by the moon by adding some gel pen along the edges too.  A little went a long way on the grave markers too. Cool, huh!?
Here are the product links from Whimsy: 
Thanks for popping by to look today! 


Thursday, August 29, 2024

Gnome Friends


I had a wonderful time creating this scene card with this little gnome from "Gnome Friends", a clear stamp set at Whimsy.  It is for a purple loving person, so I had to include that colour!  I primarily used Copic alcohol markers to illustrate the scene.  The gnome was the first thing stamped and then coloured. Then I cut out the panel with a retired Whimsy Stamps die, and proceeded to create the background.  I drew it in starting in the sky  and drew around the clouds with BG32, then filled it in.  I used BG 11 to fade out and then into G20.  When I did the medium tone background trees, I got a misty, faded look by dipping the tip of the marker in a teaspoon or so of blender solution in the bottom of a cup.  It helped to make it look rather misty, which I love! 
I used some coloured pencils on the gnome to really bring up the colour saturation and make it stand out more.  I created the mossy look under the mushroom by using the tip of the blender pen to make little dots all over it.  There is glitter on the wings (can't see in the pic) and a white paint pen to make the sparkly magic dots.  Thank you Sandy Allnock and Amy Young for that inspiration! And thank you for stopping by!


Saturday, June 22, 2024

IG HOP ALERT!!!!!

So excited - There's a chance to win a cool prize (there's two prizes, actually) on Instagram - details are below so scroll down... note - it only pertains to Instagram, so any comments on my blog post or Facebook don't count towards the draw! You must join the hop on Insta to be entered! Details below, get scrolling!

This little panda from the new Get Well Panda set is giving out birthday hugs! Yes, there are a couple of the pandas in the set that are versatile enough to use for other occasions, and I wanted to send this hug to a special friend for their birthday! 
I coloured the bear with alcohol markers (Copics) and I used the oh-so-convenient NoFuss masks from Whimsy Stamps to mask it up so that I could safely colour the background.  This card also features a sneak peek of a new stencil coming soon to Whimsy, of the long grasses! 
I also love the gorgeous slimline stencil that really helps to frame the card in such a pretty way. 
I sponged the background in with Distress Oxide Inks - no colouring with markers, so it was very fast and fairly easy to do!
All the product links are listed below - and If you make a purchase at Whimsy Stamps by following one of my links,  I get compensated (at no extra cost to you) even if it isn't a product from my line -  And of course I get compensated for every purchase you make from my line of images at Whimsy too.  Thank you so much for your kind support - because it means I get to continue drawing for Whimsy and having fun with all of you!
Here is your closeup: 
Get on over to Instagram, and follow the instructions (seen on the @whimsystamps IG account) to become eligible for the draw!
Thanks for stopping by!


Monday, June 17, 2024

Panda Get Well

Thought I would turn this little Panda Get Well set into a Birthday set for a moment! It is easy to do with a couple of the pandas actually, like this little one hanging on for his life (not in any real danger tho, he'll be ok, heheh) from a broken bamboo branch! I used the wonderful Panda Get Well NoFuss Masks to mask off the image so that I could sponge on the Distress Oxide Inks for the background.  The grasses were also sponged on using a stencil that is COMING SOON to Whimsy Stamps! So this is also a SNEAK PEEK at a new product that will soon be available!
 I stamped the bamboo portion of the image several times to create a more bushy appearance and fussy cut them and arranged them on the card to make it look like it was emerging from the side of the card.  I coloured the little panda and bamboo with Copic markers. 
All the product links are listed below - and If you make a purchase at Whimsy Stamps by following one of my links,  I get compensated (at no extra cost to you) even if it isn't a product from my line -  And of course I get compensated for every purchase you make from my line of images at Whimsy too.  Thank you so much for your kind support - because it means I get to continue drawing for Whimsy and having fun with all of you!


Monday, March 25, 2024

Dino Mighties 2


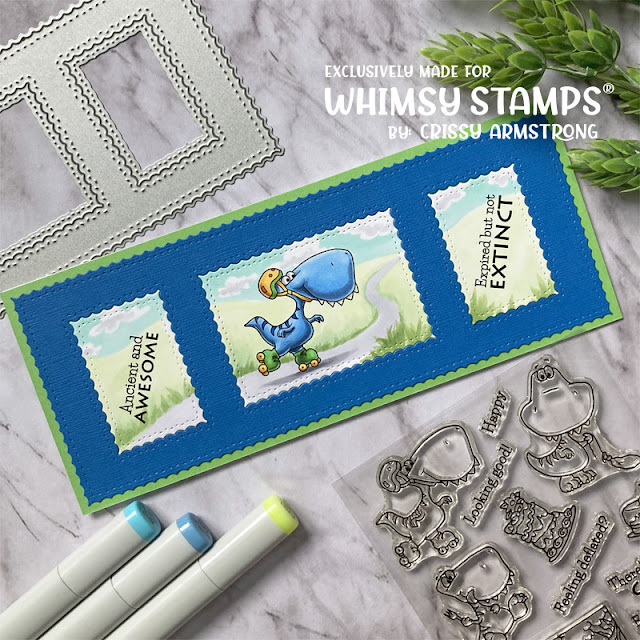
I love the humour of this set! heheh.  Just perfect for the guys in my family.  Coloured with Copic markers on Hammermill Cover Copy 100 lb. 
All the product links are listed below - and If you make a purchase at Whimsy Stamps by following one of my links,  I get compensated (at no extra cost to you) even if it isn't a product from my line -  And of course I get compensated for every purchase you make from my line of images at Whimsy too.  Thank you so much for your kind support - because it means I get to continue drawing for Whimsy and having fun with all of you!
Thanks so much for looking!


Tuesday, March 5, 2024

Dino Mighties

This was a hoot to create - I love the film strip die, it really helps when using multiple images on a card, to tell a story.  I guess the answer to everything - is cake - as these dino's suggest! heheh, well, if not the answer, a delicious cake certainly gives one a moment of pleasurable distraction!
I wanted to have two balloons in the center panel that were zoomed in on, so I hand drew those (if you look closely you will see wobbly lines, heheh). 
All the images were coloured with Copics. 
All the product links are listed below - and If you make a purchase at Whimsy Stamps by following one of my links,  I get compensated (at no extra cost to you) even if it isn't a product from my line -  And of course I get compensated for every purchase you make from my line of images at Whimsy too.  Thank you so much for your kind support - because it means I get to continue drawing for Whimsy and having fun with all of you!

Slimline Film Strip die:
Thanks for visiting!


Monday, March 4, 2024

Donkey Love

What a hoot to colour up this scene for the donkey in the bath tub! hehe This went to one of my daughters for her birthday and she loved it! 
I drew the bathroom scene around the image after I masked it up with my own hand made mask.  I used a very light grey Copic to lightly draw where I wanted all the details to be - the baseboard, curtain, towel rack and subway tile.  I used a straight edge for the subway tile, but you'd never know that I did... I'm not a straight line kind of gal, so even with a straight edge, my lines are a bit wobbly - oh well, such is the nature of hand drawing! Once everything had a place to go - towels, curtain, tile, baseboard and bubbles, I started filling them in with colour using Copic markers. After all the drawing and filling in with colour, I went over the bubbles using a Wink Of Stella pen.  The sparkle would only show in a photo if I turned the paper at an angle, as you see below. I used a white paint pen to add a few highlights in the bubbles. 

The product link is listed below - and If you make a purchase at Whimsy Stamps by following one of my links,  I get compensated (at no extra cost to you) even if it isn't a product from my line -  And of course I get compensated for every purchase you make from my line of images at Whimsy too.  Thank you so much for your kind support - because it means I get to continue drawing for Whimsy and having fun with all of you!

Donkey Love clear stamp set:
Thanks for looking!


Piggies Crushed It!

One of my favourite scenes to colour are blue skies with puffy clouds.  It just make me happy! I love looking at them in real life, as well as the challenge of colouring them! What's great is that there are no incorrect shapes - heheh - so you can let your imagination loose. The key is to make all the transitions from one shade to another as smooth and as blended as possible. I used only Copic markers on this card, and for the blue sky, I used the fatter, chisel nib.  I find it makes a seamless blend compared to the pointed flexible nib at the other end, which can tend to make lines of demarcation.  
For the blue sky, I used B02, B01, B00, B000, and B0000. 
For the clouds, used BG70, RV0000 and B0000
Piggie was RV10, R81, RV63, RV93 and RV95
Balloon was blender pen, RV02, 04, 55, 66
Hat was Y02, YG01, 03, G14, YG45
I added the hat later by fussy cutting and pasting it on.  :-)
The product link is listed below - and If you make a purchase at Whimsy Stamps by following one of my links,  I get compensated (at no extra cost to you) even if it isn't a product from my line -  And of course I get compensated for every purchase you make from my line of images at Whimsy too.  Thank you so much for your kind support - because it means I get to continue drawing for Whimsy and having fun with all of you!
Thanks for looking!


Sunday, March 3, 2024

Doggie Fun Times

What would it sound like if you tried to say"Happy Birthday" while you had a mouthful of tennis balls? Maybe something like, "Fwappy Mwrffday"! heheh
Thanks to Sandy Allnock for the background idea on one of her many Copic colouring courses.  I modified it a bit by adding evergreen trees. 
I used Copics on the background, and a combination of Copics and some coloured pencil on the dog.  
It's always fun to play with lighting, and in this case, using some back lighting so that it looks glowy around the edges of the character, and darkest in the middle.  
All the product links are listed below - and If you make a purchase at Whimsy Stamps by following one of my links,  I get compensated (at no extra cost to you) even if it isn't a product from my line -  And of course I get compensated for every purchase you make from my line of images at Whimsy too.  Thank you so much for your kind support - because it means I get to continue drawing for Whimsy and having fun with all of you!
Thanks for looking!


Friday, February 23, 2024

Unicorn Daydreams

Hi everyone! This card features a digital unicorn from Whimsy, that I printed and coloured with a combination of Copics (that went on first) followed by some coloured pencil on top.  The forest background was inspired by Sandy Allnock and her classes, which I have been doing!  Highly recommend her classes if you are unsure how to create a background for your images.  She really helps me get some great ideas!
Once I had coloured everything I added the little stardust bits with a white acrylic paint pen.  Then all I had to do was die cut the word "Enchanted" and glue it on. 
All the product links are listed below - and If you make a purchase at Whimsy Stamps by following one of my links,  I get compensated (at no extra cost to you) even if it isn't a product from my line -  And of course I get compensated for every purchase you make from my line of images at Whimsy too.  Thank you so much for your kind support - because it means I get to continue drawing for Whimsy and having fun with all of you!
Thanks for visiting!


Thursday, February 22, 2024

Gnome Warm Wishes

It's never too early to start again! Here is one that really didn't take much time at all. I striped the background paper with the Brushed Stripes red rubber cling stamp and some Color Box ink.  The image was colored with Copics and fussy cut.  I stamped the sentiment in the same ink as the stripes and doodled a random frame around it to add a touch more detail.  C'est tout!
All the product links are listed below - and If you make a purchase at Whimsy Stamps by following one of my links,  I get compensated (at no extra cost to you) even if it isn't a product from my line -  And of course I get compensated for every purchase you make from my line of images at Whimsy too.  Thank you so much for your kind support - because it means I get to continue drawing for Whimsy and having fun with all of you!
Brushed Stripes Red Rubber Cling Stamp: 


Wednesday, February 21, 2024

Birthday Cool

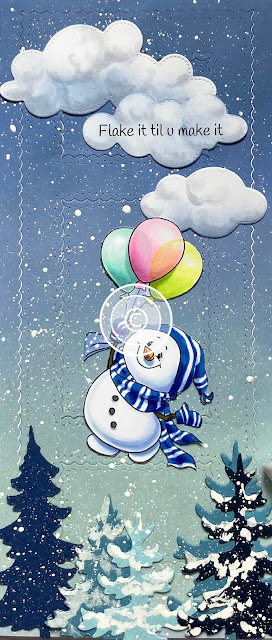
This card was for a winter birthday - we still have a lot of snow and very cold temps in my neck of the woods! I had fun making this winter scene using some evergreen tree dies, some Oxide inks blended on the background sky, and some spattered snow using a white opaque paint.  I gave it some extra details by using the Slimline Scenic Window die set. I like how it has the subtle window cut outs with a scalloped line to show a little bit of unexpected texture and interest to the card.  The clouds and main image were coloured with Copic markers.  I fussy cut the snowman and pasted him onto the card after everything else was done. 
All the product links are listed below - and If you make a purchase at Whimsy Stamps by following one of my links,  I get compensated (at no extra cost to you) even if it isn't a product from my line -  And of course I get compensated for every purchase you make from my line of images at Whimsy too.  Thank you so much for your kind support - because it means I get to continue drawing for Whimsy and having fun with all of you!
Thanks for stopping by!