Sunday, March 29, 2009
HHC 24 and Copic Coloring Tips
Our darling Diva Ila is hosting this week's fun High Hopes challenge! She would like us to use our imagination and decorate the borders of our cards in creative ways. Use anything you want; punches, lace, ribbon, brads, buttons, twigs, tearing, doodling, sewing, ANYTHING! I chose to use cinnamon sticks!
Go to the blog and see Ila's card -- her card displays the stamp prizes that are up for grabs! Just make a card or other stamped project for the challenge and post a link to the photo on the High Hopes Blog in order to be eligible to win the draw! Good luck and have fun!~
I stamped Party Donkey and Champagne Glass using Memento Tuxedo Black ink by Tsukeneko onto Manga artist pad by Canson. Here are the sayings I used: Celebrate and Yee Haw!
I made the tag out of Basic Grey paper and rounded the edges with my small corner punch, then punched a hole with my paper drill.
Blue dp is Daisy Bucket.
The tray of champagne was colored and then cut out and popped up with foam tape.
The highlights on the champagne bottle were just where I left the paper white.
I used Copics to color the images, and used the feathering technique to get that furry appearance on the donkey.
To feather the colors, use the brush tip of the marker. Press it down to the paper, and then in a sweeping motion, sweep your stroke up and away, gradually lifting it off the paper. It is a very small and quick movement. Your strokes of color should be short, no more than a quarter inch long. Practice on a scrap paper. It is the same technique I use when I draw grass with Copics. I'll call it a flick (you know, "flick of the wrist! lol). The only difference between using this technique on grass or fur is, with fur, I try to keep the sweeping flicks all going the same way, or at least circling outward from the middle (of his tummy in this case). But with grass, I want it to look uneven and haphazard, just like real grass, so I can be more random and change directions a lot, and even make some of the grass bend over at the top. I also make some strokes longer and some thinner or thicker.
It might help you to know that I start in the center, with the lightest color, and work my way outward. I then go back in and layer a shade or two darker. Leave the largest area light and use the darker colors more sparingly around the outside and underneath parts. If you want the texture of fur, don't overblend. Leave the lines of demarkation that are showing. That is what makes it look like fur.
To get the highlights on the hooves, I actually use the feathering technique there too. I flicked the darker browns in toward the middle but left some of the paper white where I would work on my highlight later. After I was happy with the blend of darks I had, I took the lightest brown I was using and did more feathering, only in even shorter strokes, just off the end of the dark I had already colored, still leaving a thin streak of white paper showing. These are very tiny areas so you have to really control where you are putting the color.
I then took the blender pen and starting on the tiny white portion, feathered outwards into the dark areas. Because I did it while the paper was still damp with the brown ink, the blender solution pulled some of the brown ink in to the white area, but it removed the hard edges and caused a nice blend. I love the effect! Note; you do need to keep going until you blend all the color of the hooves, because in this case you don't want the lines of demarkation that you do want with the fur. Use the lightest brown to blend on the dark areas and the blender pen to blend in the highlighted areas.
I actually used the cinnamon sticks to adhere the main image to the card base. I punched holes in the main image panel as well as the card base and tied it on with the pink paper ribbon. I think I did secure it a bit with a strip of tape on the back too, just so it wouldn't move around.
I gave the pink champagne some sparkle with Stickles. The button was from a bunch I made out of Sculpey. Love that stuff!
Here is the inside of the card:
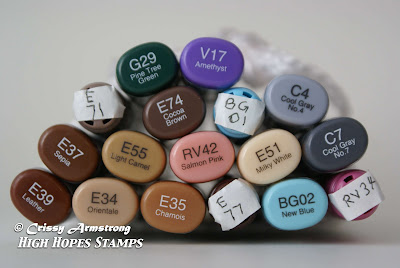
And the colors I used:
Thanks for looking today, and remember,
God
Loves
YOU!
Thursday, March 26, 2009
Copic Certified!
I got certified!! I took the Copic Certification Course this week in Toronto . What a BLAST! I wish I could do it again already! There was SO much to learn and our darling teacher, Marianne Walker is, in my humble opinion, one of the most skilled, talented and mind blowing artists I have ever had the joy to meet!
Now you'll have to forgive me, I tend to forget to take photos, so I only have three to share with you, but here are my stamping buddies that I shared a room with in the hotel. L to R its Janette Olen, Kim Reid, Andrea Murdock, and me :
When I first arrived at the hotel, Kim saw me and came RUNNING down the hall to meet me!! I knew I loved that woman from getting to know her online, but that just sealed the deal for me. Anyone who runs to meet me cuz they are so excited about it wins my heart, hands down! And it only got sweeter from there. Her and her best bud Andrea went to Stamping Bella the day after I arrived and picked up some inks for me. Love you guys! Waving!!
While Kim and Andrea (Andrea is a HOOT. Kept us laughing!) were in stamp heaven, I went in the other direction to visit with my daughter Valerie in St. Catherines, and to meet up with Janette who was coming up from the States. It was another moment of sweetness to finally see her in person as well, and we shared some great conversation over at Val's house. Janette, you are a generous and sweet girl! Waving!!
Back at the hotel we stamped off images from one another's stashes and chatted up a storm. The sweet Amy Leggate joined us for the evening too! It was such a fun pajama party! Topic of conversation: Stamping, of course!
The three High Hopes Divas:
Andrea and Kim having fun stamping in our hotel room Sunday night:
I highly recommend the course to anyone who is wishing to learn how to play with Copic markers. Marianne is not only a skilled artist but also definitely knows how to teach. She was just brilliant and kept a flow going. I just gawked at her artwork too, it is astounding, but even moreso when you see her do it right before your eyes. At lunch time, in the restaurant, she turned a blank page into a work of art. Took her, what, twenty or thirty minutes? Definitely raised the bar for me, personally, to watch someone like that. I have an excitement about where I can grow as an artist because of her demonstrations.
God bless, and thanks for visiting!
Saturday, March 21, 2009
HHC23 Buttons Galore!
This week's challenge over at the High Hopes Blog is brought to us by the fabulous Niki Estes! She has called this challenge, "Buttons Galore". And I think that is pretty self-explanatory! So make a project and add buttons to it; you can add just one, or go for the gusto and add a ton! heh-heh. If you want to join the challenge, your name will be entered into a draw at the end of the week to win two High Hopes stamps. Just make your project and post a link to it on the High Hopes blog, that 's all there is to it!
Well, I bought some Sculpey modeling clay the other day and I couldn't wait for a motive to use it on a card! You may have heard of "Fimo". Same stuff, different brand name is all.
I thought it would be fun to make my own buttons for this challenge, and so I did. For any of you who are like, "oh wow, she made her own buttons," that is a joke! Each one took about thirty seconds to make.
It was a matter of; pull a chunk of Sculpey off the block (two seconds), about the size of a cherry pit (sorry, couldn't think of any other descriptive comparison, snort!), knead it for five seconds til its soft, roll it into a ball (four seconds), put it on a scrap paper and squish it down with one finger (three seconds), pick it up and pull a darning needle through it in two places, and spin the needle around a bit to open up the holes a bit more (ten seconds), DONE. Ok, I was wrong, that was only 24 seconds! The heart button took a wee bit longer, but not by much.
I did a whole pile of buttons and followed the package directions for baking so they would harden. To get the two tone colors, I just took a bit of rose red and a bit of white and kneaded them together a little bit, making sure to not over mix so it wouldn't turn pink but leave the nice streaks you see. Easy peasy!
I used Copics on the image and a bit of glitter glue inside each pink flower. I wanted the wood to look pinkish, and so I colored the entire surface of the outhouse, except for the roof and chimney, with pink! I used the brown shades overtop of this. I like the effect!
The sketch is brought to you from this week's sketch challenge over at SCS so I don't take credit for that. I like how it gave the feel of wood panels, esp. from the Basic Grey paper that has a pink wood grain. The other dp with the grey swirly design is from a pack I got at the dollar store, go figure.
That's just white hemp coming out the button holes. I simply wound it tightly around a thin paintbrush handle to get it to spiral out like that.
A close-up of the colored image:
Inside the card:
Copic markers used:
Thanks for dropping by for a visit! Always great to see you here! (heh-heh).
If I can leave you with one thought, it is this;
you
are
loved
by the one who IS love
He thinks you are special!
Winner Announced!!!
Random Integer Generator
Here are your random numbers:
7
Timestamp: 2009-03-21 14:25:42 UTC
The winner is commenter #7 and that happens to be.... drumroll please...
Christine Riley!
Christine please contact me via e-mail and give me your mailing address! I will get the card mailed out next Wednesday. I am going out of town for a few days and so I'll mail it when I get back. Congratulations!
PS My reason for going out of town is to take the Copic Certification course!! Yahooooo!!! Best part of all will be just hangin' with Kim Reid, her friend Andrea, and Janette Olen! Two of my peeps from the Divas!! I will also get to meet Amy Leggate I think too! How cool is that!!
I'm posting this a bit earlier today than I planned so I can concentrate on packing...
see you guys soon!!!
Thursday, March 19, 2009
subscription problems
My apologies to those of you who have subscribed to my blog using the "Feedblitz" link. I was under the impression that I could access this service for free, provided I allowed ads in the notices. I have gotten notice from them that I need to now pay for this service or it will be discontinued. I'm opting out of paying for it, so as of tomorrow, you will no longer be receiving these notices. Someone told me Feedburner is free, but after a trip to their site, I cannot for the life of me decipher the "computer speak" to the point where I can access it. If anybody has some very specific instructions, step by step, that I can follow to get a Feedburner app. on my blog, please let me know. I would truly appreciate it!
Thank you dear subscribers, for your support of my blog. I hope to get the Feedburner thing figured out so you can continue!
Hugs all!
Crissy
Thank you dear subscribers, for your support of my blog. I hope to get the Feedburner thing figured out so you can continue!
Hugs all!
Crissy
Sunday, March 15, 2009
Giving This Card...to you maybe?
I'm all excited... I am going to have a draw, just like for blog candy, and pick a winner to receive this card! If you want to be eligible, just leave a comment on this post. You will have until next Saturday March 21 at 10 AM, EST. Isn't there some sort of download I can get to choose a random number? Random Interger or something? If you know about that, let me know so I can find it and use it, ok? (edited to add, thanks to the tips guys! I think I'll be all right now!)
I will announce the winner sometime on the night of Saturday the 21st. The winner will have until Thursday march 26 to contact me with their mailing address. I will ship anywhere. If the winner doesn't contact me by then, I will choose a new winner on Friday.
This is just a small token of my appreciation for all the kind bloggers who come by and pay me a visit and leave such sweet comments for me. I know it isn't much, but I want you to know, I have been collecting stamps and stuff and when the timing is right, I am going to have a huge giveaway of stamping candy! For now, I'm just giving a card. You'll just have to stay tuned to see when I'm going to do the BIG Candy Blow-out!
Anyway, on to my card: This is for the High Hopes Challenge 22, which was hosted by Diana Pickering, one of our divine Divas! She wanted us to refrain from using any Designer or Patterned paper. No problemo! I love that challenge, as I love to make my own! Don't forget, Tina of High Hopes Stamps gives TWO free stamps away EVERY WEEK! If you want to be eligible to win them, join in the challenge and post a link to your card on the High Hopes Blog!
Here's what I did to make my background panels: I took glossy white cardstock, and four inks: Ranger Distress Walnut Stain, Memories Chestnut Brown, Memories Sepia and Adirondack Rust. Starting with the Rust, I turned the stamp pad over onto the glossy cs and swiped it until the color was rich, but not totally saturated. I did the same thing with the Sepia, and Chestnut Brown, making sure I did not cover the entire area. I then aded the Walnut Stain, but only sparsely, as it is a very dark color. By swiping it right from the inkpad, I got lots of nice lines that resemble wood grain. I love that! I let that dry for a few minutes and then took a very coarse sand paper and roughed up the edges and scratched up the entire surface. I cut a piece off that I used for the large base and on this piece only I went over the whole thing again with the Walnut Stain. Now it really resembled wood! I was happy! I left the smaller skinny panel without the final layer of Walnut, cuz I liked how it contrasted with its' white edges.
I stamped Miss Peggy first (using Tsukeneko Tuxedo Black Memento Ink on Magna Drawing Pad paper), then stamped her again on a post it note and cut it out for a mask. I masked her, then stamped Farmer Clem beside her. I also made a mask for him. I put both masks on and then stamped the farm background behind them. I should have stamped it over to the right a bit more. As it was, I had to continue the lines of the hills a bit with a black liner pen after all the coloring was done. I wouldn't have had to if I had been more careful and positioned the stamp properly, as part of the hills on the left side got cut off. Ah well, careful is not my middle name! lol
All four of these stamps are the current Project Of The Month and are now on sale at 25% off the regular price!
This is an oversized card (6" x 6" I think) so I made two tabs to join the front piece to the back piece. I made them by cutting 2 equal strips of paper, and rounding the corners with a small corner rounder punch. I scored them at the halfway point and folded them over. I punched holes through all pieces and threaded the white hemp through them and through the buttons and tied it in a knot. That is the only thing holding my card together!! It's actually quite sturdy though. I used mini brads to hold the tabs onto the back piece.
I colored the scene I made using Copic markers. Here is the (long!) list of colors I used:
On Farmer Clem's jeans:
B02
B23
B34
B41
B97
B99
Farmer Clem's Face:
E00
E02
E93
R22
E71 (for the deepest shadows and his stubble area)
On his shirt:
E31
E34
E35
Other colors I used on him:
E07
E09
E19
E25
E27
E47
E 51
Y21
G05
On Peggy Pig:
E11
E21
R22
E71
On the ground, hills, trees, barn and ground:
E08
E09
E43
E39
E44
E50
E53
YG91
G12
G21
G94
BV20
B21
W1
W3
N5
C2
Colorless Blender was used throughout.
Here is what I did for the inside:
And here is a close-up of the coloring. The sky I had colored didn't turn out and so I cut along the top of the image and ended up popping it up against a blue piece of cs. I doodled around the outside edges with a white gel pen which I also used to highlight the cheeks of the characters. Thanks so much for looking and God bless you today, and may you see His amazing love and care for you in the little things!
Sunday, March 8, 2009
HHC21 Zigs and Zags
Todays challenge on the High Hopes Blog is brought to us by Anna Wight! She would like us to use zigs and zags on your card; it is open to your own interpretation. I chose to use my sewing machine, as you can see.
I stamped Ms Griffon with Versafine Onyx black ink on Canson 140 lb cold press wc paper and painted it with my Twinkling H20's. I sponged the edges of the main image with Memories Chestnut brown dye ink. I used a Martha Stewart punch for the balloons, highlighted them with a white gel pen, and added some glitter using my Diamond Dust.
Don't forget that if you want to join this challenge and post a link to your card on the HH blog, your name will go into the draw for two free stamps from High Hopes!
So, we have had some above zero temperatures, and actually lost about a foot of snow! However, we are expected to get two inches tomorrow. Two steps forward (towards spring!) one step back.
I watched "Fireproof" with my hubby lastnight. The acting and some of the dialogue was under par, however, it is worth the watch because the message was so powerful and the story was so moving. I highly recommend it.
May you have peace in your heart today, and just a little more trust in God than you had yesterday. Remember, He is good! And He loves you!
Thank you so much for stopping by and taking the time to read and look!
Sunday, March 1, 2009
HHC20 Got That Fuzzy Feeling?
This week’s fun challenge over at the High Hopes Blog is brought to us by Jeanne Streiff! She has named it, “Getting That Fuzzy Feeling?” The idea is to add a fuzzy texture to your card, by using felt, fibres, fun flock, pom pom, fuzzy ribbon, etc. If you have nothing like that at all, then at least choose a stamp character that is fuzzy! Lol
For my card today I chose an old favorite of mine, Elmer Elephant and put him in a simple jungle scene. I stamped the ellie and the Jungle Leaf Corner using Versafine Onyx Black on Canson 140 lb. cold press wc paper . Using my artist wc paints, I painted the image with a first layer of paint. I let the image dry thoroughly and proceeded to liven up the colors using Twinkling H20 paints. I find that my regular watercolor paints sometimes don’t have the pizzazz and punch that I’m looking for on a stamped image. And so the Twinkles are great to have because they are so vibrant and tend to liven up the colors and add a nice shimmer too!
I added a few extra leafy fronds with my Martha Stewart punch and I added a bit of interest to the pink background layer with a couple of rows of piercing done by my sewing machine.. You can't tell in the photo but the main image panels are popped up a bit on foam tape. My "fuzzy" addition is the rough jute in the top left corner and across the front bottom of the image.
Don't forget, if you join in the challenge and link a photo of your creation onto the HH blog, you get entered into a draw for two free HH stamps! Winner announced next Sunday.
Happy Stamping, and God bless you!
He loves you!!
Adores you!!
Wants you for His own!! xo
Subscribe to:
Posts (Atom)