Sunday, September 20, 2020

Gnome Haunted Forest


 Halloween is just around the corner, and these little gnomes are getting scared! They are a red rubber stamp from Whimsy called "Gnome Haunted Forest".  I coloured the scene with Copic markers.  It was fun to make the dramatic lighting on the tree trunk and parts of the gnomes! I used the "Boo" sentiment from the "Penguin Spook Nite" set and stamped in white and then heat set with white embossing powder to make it stand out.  I then used one of the dies in the "Comic Speech Bubble" die set to cut out the sentiment - so perfect for this occasion! Background paper is from the digital pack, "Starry Night".  

Thanks so much for stopping by!


Friday, September 18, 2020

My Creative Scoop's new course!

 Mindy Baxter has another set of classes out for this fall! I partnered with her to draw the images that she is using for these classes. Didn't she colour them beautifully?! I just love her scene work! You can learn how to do all of these beautiful scenes if you sign up for her courses! The early bird price is only on for two more days, so get it while it's hot! Go here!


Saturday, September 12, 2020

Gnome Birthdays

Hi there! Today I've got a gnome from my Gnome Birthdays clear set at Whimsy Stamps, hope you like him! I like how these gnome characters could go for either a male or a female recipient; that opens up the possibilities, doesn't it!? I decided to make this a tiny gnome who was having his cake outdoors amidst the tall (to him) mushrooms and grass.  The image is coloured with Copics and the scene hand drawn with Copics too.  I really enjoy doing scene cards these days; they are challenging but very rewarding too. 
The word "smile" is a die from Whimsy as well. 
Thanks so much for looking today!


Friday, September 4, 2020

Crittercorn: Panda


Hi all! This is the panda from the Crittercorns clear stamp set at Whimsy Stamps.  He was coloured with Copic markers.  I drew the flower separately on the front of the card and coloured that in with Copic markers. The background is a fun technique using the blender solution.  I coloured it in completely, then dropped tiny droplets of the blender solution all over to get this bokeh effect.  I fussy cut around the panda and adhered him to the daisy with two sided tape.  The sentiment is from the Yoga Animals set and die cut with a die from the Quick Strips set at Whimsy.  Thanks for looking! 


Sunday, August 30, 2020

Crittercorn: Zebra

Hi folks! This is the zebra from the clear stamp set, "Crittercorns" that came out in July.  It also has a panda-corn and a bunny-corn.  The inspiration for this set came from my grand daughter, who told me all about the panda-corn first, which I had never heard of before, but of course I believed her after she told me about it's existence! So I just had to draw the panda corn, and then the zebra and bunny corn to go with it (didn't want the panda corn to be lonely, you know). 
I coloured this critter and scene using Copic markers. Striped paper is from the Fabulous Florals paper pack at Whimsy.  Thank you for looking! 


Friday, August 14, 2020

Bunnycorn

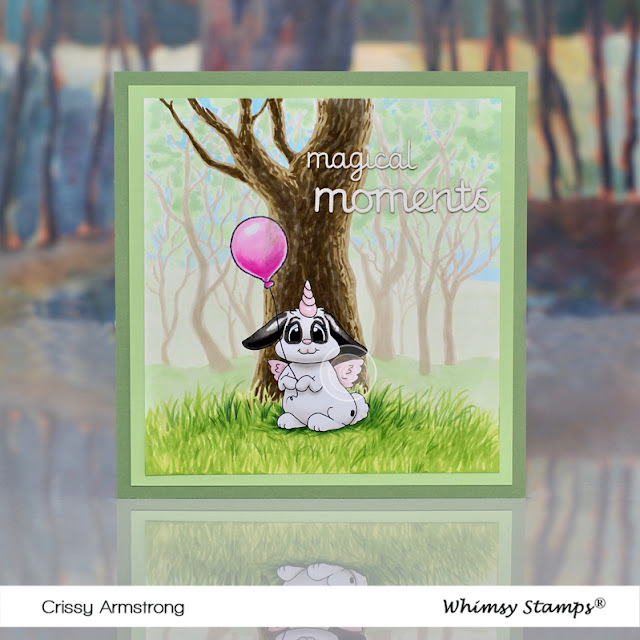
Hi folks! Here is Bunnycorn from the clear stamp image set called "Crittercorns".  I had fun creating this forest scene for it (I especially love drawing bark on trees!). Image and background was coloured with Copic markers. The black markings on the bunny reflect the actual markings on my grand daughter's real bunny, and the card went to her for her first birthday. Thanks so much for looking!  Here is your closeup:


Wednesday, August 12, 2020

Gnome

This is a gnome from my "Gnome Sweet Gnome" digital set at Whimsy Stamps. I printed him out on Hammermill 100 lb cover copy and coloured him with Copies, then fussy cut him and set him aside. Next I made the background by drawing the daisy very lightly in pencil and shading and colouring it with Copic markers.  The background behind the daisy is also Copic markers with blender solution to create the bokeh effect. It is really fun to do but you must be careful when you start dripping the solution close to the image - it can spread further than you think - so for the areas near the flower, I used the blender pen so that I would have good control over where the solution went. I used the Quick Strips die set for the sentiment.  Thanks so much for looking!


Tuesday, August 11, 2020

Fairy Dreams 2

Here's a second fairy from the set "Fairy Dreams", a new release at Whimsy Stamps. This one is in red rubber.  I drew the daisy for her to sit on and created the background with Copic markers (whole thing was coloured with Copics) and careful use of the blender solution to make the bokeh effect.  After covering the page with the alcohol marker (in this case B63 and bits of BG11 and B02) you carefully let drops of the blender solution fall on the page, and hope you don't get a drop that spreads too close to the image! I used the blender pen for those spots that are closer to the petals so that I had more control.  The background and fairy were separate, actually, so I fussy cut her and pasted her on once the daisy background was completed. I made the frame using Whimsy's Notched Squares die.  The sentiment came from Peruvian Lillies set, and the oval is a die in the Quick Strips set.  Here is your closeup:
Thanks so much for looking!

Fairy Dreams

 Does anyone else (besides me) want to BE her? Drifting peacefully on a calm, cool lake on a sunny day right about now?... ahhhh... She's from the new "Fairy Dreams", a rubber set with three fairies and sentiments to go with them. I coloured her and the scene with Copics. The paper is a sheet from "Fabulous Florals" paper pack. Purple sheet from "Chilly" paper pack. Below is your close-up and, thanks for looking!

Thursday, June 4, 2020

Whimsy Weekend, freebies and a demo

Hi folks! Hey, guess what, Whimsy is putting on a virtual crafting weekend over on Facebook on this coming weekend, June 6 and 7!  I have a free image for ALL who attend, and I'm not the only Whimsy artist giving one away to ALL attendees! Along with the freebies, there's also many different  prizes with multiple ways to get in on the draws, so head on over to the page to find out more HERE
Yours Truly will be doing a live colouring video on Sunday morning at 10 AM ET,  in which I will colour the free image. Yes, you heard that right, there's a free image AND a free colouring demo taking place, but only for those who attend the event on Facebook.  Hope to see you there!

Monday, June 1, 2020

My Creative Scoop and Mindy Baxter special course

Mindy Baxter of My Creative Scoop is a fantastic colourist and teacher of Copic colouring.  She approached me not too long ago and requested I draw some images that she could use in an upcoming course (that's a whole course, not just a single class!).  It was an easy 'yes' from me because we share the same values of being helpful in the crafting community, not only towards our customers, but also towards our fellow business owners.  So I agreed to illustrate some exclusive images just for her. The images are pictured below, however, these are just sneak peeks - Mindy actually created some pretty awesome backgrounds for each image that will inspire you and allow you to complete a whole scene! Her course will teach you how to do it easily, step by step (talking from experience here, because I took one of her courses awhile back, trust me, she's easy to understand and very helpful!). It is available for a short time at a discount, so get in on it while you can. You gotta act quick to get the discount, so do not wait! Here is the link to find out more details: My Creative Scoop 
Thanks for visiting today!

Tuesday, May 12, 2020

A Guy Card; Barnyard Squares

Hi Peeps~ 
Here's my new Barnyard Squares set, a clear stamp set that came out first of May at Whimsy Stamps.  I wanted to make a birthday card for one of my son-in-laws, and this seemed like the perfect fit.  This set goes for either guys or girls though, because you can put them in a more feminine setting if you want, as many already have.  I coloured the images using Copic markers.  The background wood grain was made using a red rubber background stamp called "Farmhouse Shiplap".  For the wood grain layer, I inked up the white card first as I imagined old barn wood to look.  I used various Distress Ink Oxides for that. Then I stamped the Farmhouse Shiplap in black after using the Distress Oxides. If you stamp first and Oxide ink later, you end up covering over the lines of the wood grain, so the order is important.  The word "happy" is a die at Whimsy Stamps, but the word "birthday" was from an older die set that has been discontinued.  Thank you so much for looking today!

Sunday, April 19, 2020

So far this year...

Hi People! It has been awhile since I have blogged regularly.  So much has happened, in all of our lives.  So many changes.  Here is a sampling of cards I have made this year so far.   Card making is still my go-to when I need to relax and go to a happier place in my head.  I hope you have something too that takes your mind off stressful thoughts and brings you a sense of peace and fulfillment.  Please enjoy my little gallery here, and if you have any questions, just fire away in the comment section and I will do my best to answer.  All of these animal images were drawn by me for Whimsy Stamps and you can find them in the Clear Stamp category with the exception of the penguin which is in the digital section of the catalogue. Thanks for coming by today.  Take care, stay home and stay safe, and if you must venture out, keep your distance from others, cover your face and wash your hands often.


Thursday, April 2, 2020

Penguin Medics

It is my wish to honour those who are putting themselves in harm's way in order to save lives. I hope we can honour them by keeping ourselves home as much as possible to help curtail the spread of this awful disease, so that our hospitals and whole medical system, and the brave people who run it are not overwhelmed.  We can do something about this.  Stay home. 
These images (un-coloured digital versions) are free for anyone who would like them.  Go to this page to find out how to download yours. If you aren't on Facebook, then go to THIS PAGE
I coloured each penguin using Copic markers.  Thanks for looking!
Take care everyone.