Our darling Diva Ila is hosting this week's fun High Hopes challenge! She would like us to use our imagination and decorate the borders of our cards in creative ways. Use anything you want; punches, lace, ribbon, brads, buttons, twigs, tearing, doodling, sewing, ANYTHING! I chose to use cinnamon sticks!
Go to the blog and see Ila's card -- her card displays the stamp prizes that are up for grabs! Just make a card or other stamped project for the challenge and post a link to the photo on the High Hopes Blog in order to be eligible to win the draw! Good luck and have fun!~
I stamped Party Donkey and Champagne Glass using Memento Tuxedo Black ink by Tsukeneko onto Manga artist pad by Canson. Here are the sayings I used: Celebrate and Yee Haw!
I made the tag out of Basic Grey paper and rounded the edges with my small corner punch, then punched a hole with my paper drill.
Blue dp is Daisy Bucket.
The tray of champagne was colored and then cut out and popped up with foam tape.
The highlights on the champagne bottle were just where I left the paper white.
I used Copics to color the images, and used the feathering technique to get that furry appearance on the donkey.
To feather the colors, use the brush tip of the marker. Press it down to the paper, and then in a sweeping motion, sweep your stroke up and away, gradually lifting it off the paper. It is a very small and quick movement. Your strokes of color should be short, no more than a quarter inch long. Practice on a scrap paper. It is the same technique I use when I draw grass with Copics. I'll call it a flick (you know, "flick of the wrist! lol). The only difference between using this technique on grass or fur is, with fur, I try to keep the sweeping flicks all going the same way, or at least circling outward from the middle (of his tummy in this case). But with grass, I want it to look uneven and haphazard, just like real grass, so I can be more random and change directions a lot, and even make some of the grass bend over at the top. I also make some strokes longer and some thinner or thicker.
It might help you to know that I start in the center, with the lightest color, and work my way outward. I then go back in and layer a shade or two darker. Leave the largest area light and use the darker colors more sparingly around the outside and underneath parts. If you want the texture of fur, don't overblend. Leave the lines of demarkation that are showing. That is what makes it look like fur.
To get the highlights on the hooves, I actually use the feathering technique there too. I flicked the darker browns in toward the middle but left some of the paper white where I would work on my highlight later. After I was happy with the blend of darks I had, I took the lightest brown I was using and did more feathering, only in even shorter strokes, just off the end of the dark I had already colored, still leaving a thin streak of white paper showing. These are very tiny areas so you have to really control where you are putting the color.
I then took the blender pen and starting on the tiny white portion, feathered outwards into the dark areas. Because I did it while the paper was still damp with the brown ink, the blender solution pulled some of the brown ink in to the white area, but it removed the hard edges and caused a nice blend. I love the effect! Note; you do need to keep going until you blend all the color of the hooves, because in this case you don't want the lines of demarkation that you do want with the fur. Use the lightest brown to blend on the dark areas and the blender pen to blend in the highlighted areas.
I actually used the cinnamon sticks to adhere the main image to the card base. I punched holes in the main image panel as well as the card base and tied it on with the pink paper ribbon. I think I did secure it a bit with a strip of tape on the back too, just so it wouldn't move around.
I gave the pink champagne some sparkle with Stickles. The button was from a bunch I made out of Sculpey. Love that stuff!
Here is the inside of the card:

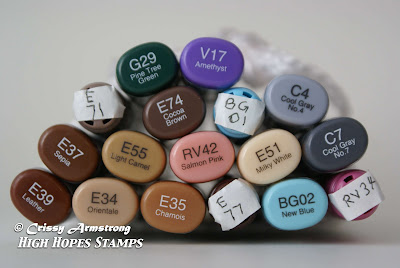
And the colors I used:

Thanks for looking today, and remember,
God
Loves
YOU!


Hi!! This card is so cute and I love your creative border. What a cute idea. I have to say, I love your coloring. Gorgeous!
ReplyDeleteAndrea :)
Fabulous Crissy!! The feathering technique looks awesome!!
ReplyDeleteThis is such an adorable card, I love it! :) Thank you so much for the copic tips too, I'm still learning with my copics so these tips were very helpful.
ReplyDeleteHugs and Blessings,
Christine :)
what a supercute motive! I love your coloring!:D
ReplyDeleteHi Thanks for the tips on using copics. This is a stunning card and I love the edges, hugs Pascale
ReplyDeleteSo fun and lovely card. Lovely bright colours.
ReplyDeleteHugs from Inger Marie
This is so adorable, Crissy! Your talent never ceases to amaze me! Thank you for the coloring tips too! Super helpful!
ReplyDeleteI love your blog. Thanks for sharing all those beautiful pictures of your family...God has truly blessed you...everyone looks so happy and full of life and love!
Your card is so fun and cheerful, I love it!
ReplyDeleteParty Donkey is a hoot! I love it, and I really like your copic coloring:-) he looks really good!
ReplyDeleteCinnamon sticks add a fun flair to the challenge:-)
Very nice
michele spera
A gorgeous card, thanks for the colouring tip!
ReplyDeleteClairexx
Looooovin' party donkey!!! Look at you work your Copic certification skills!!! *LOL* I always thought your colouring was fabulous even before the certification class!!! Love the use of cinnamon sticks and the oh-so-sparkly bubbly!!! Looks like party donkey is getting ready for some real celebrating!
ReplyDeleteGorgeous colouring Crissy and I just love how you have used the cinnamon sticks and pretty pink paper ribbons, the inside looks gorgeous too, Big Hugs, Nikki x
ReplyDeleteVery cute card...but I always love your cards! Thanks for the Copic tips. I haven't tried that technique before.
ReplyDeleteCrissy this is a awesome card, and i bet that it smells as good as it looks with those cinnamon sticks... thank you for sharing your wonderful talent. hugs rachxx
ReplyDeleteI'd say you have mastered the copics....Love you blog....
ReplyDelete(((Hugs)))
Gorgeous card and amazing colouring!! Thankyou so much for the tips re colouring. I attended a rather poor copic workshop a the weekend and I think I have found out more from your post than I did there. Have a great week sweetie
ReplyDelete-x-
This card is Amazing Crissy and So Darn Cute!!...I love the coloring and cinnamon stick borders!...Thanks so much for sharing the tips you've included here....Wonderful!!...Hugs, Ila
ReplyDeleteI love your creative borders! This card is just too cute!
ReplyDeleteHey there! I didn't have a chance to comment on this card earlier...busy week. Anyway, I just love your creative border!! I bet the card smells yummy! Your coloring is amazing...it doesn't matter what medium you use..you rock them all!! Big hugs :-)
ReplyDelete~Lacey
Your images are so adorable Crissy! How much fun you must have drawing them for High Hopes! A fabulous design, wonderful coloring!
ReplyDeleteGosh, your cards and colouring leave me speechless, this is so gorgeous...thanks fot the excellent copic colouring tips...oh there is just so much to learn. What a pity we can't do the copic classes in the UK.
ReplyDeleteCarole :D