Sunday, April 25, 2010
Design Team Call!!
I have opened up a new challenge blog and I am going to need a Design Team! Please click HERE for the details about how you can apply!


Sundays With Crissy challenge #2

Hope you are all having a good weekend! I know I am. Going for a motorbike ride with hubby Mike this aft. Fun!
Today my card features "Hang In There" which I did as a digital image for Whimsy Stamps. Also featured on the card is the "hang in there" sentiment by Ann Vento of Raindrop Echo Designs. She does the nicest sentiment sets I have ever seen! And the digital versions Whimsy sells are so affordable too! I also used some Whimsy Buds as well, aren't they gorgeous? I coloured the tips of the small roses just to give them some more of the warm pink tones I used on my card.
I tried a different technique for the background behind mr. turtle this time. I tried to make it look water coloured (but it is all Copics). How did I do? If you like it and want a tutorial on it sometime, I will put it on my list of "tutorials-to-do". Just let me know.
This is a sample card for my second challenge at "Sundays With Crissy"! The challenge is easy peasy: it is "Dots", open to your interpretation! I hope you will join me. Click on Sundays With Crissy to see all the details!
List of Colours Used
On Turtle's brownish patches:
I started off with E04 and 07, but it looked to "orange" and didn't match the papers well enough. So then I added RV11 and R85 over top to give it a rosy tone.
I used the blender pen to remove colour to add white dots, and used R89 to add some dark dots.
The turtle green parts were:
G00, G12, G14, G16 and G99
Same greens on the leaves but also G28 in the deepest shadows.
E50 and 55 on the branch
Blossoms: RV000, 02, 10, 11, 91, Then R85 and 89 overtop
Background:
G0000, 00, RV000, and RV10, with lots of Blender pen on the paper before and after applying the colours.
Faded Lipstick Distress Ink sponged around the edges of the main panel and sentiment heart.
Some CB and Spellbinders dies used, as well as MS punches.
I gave this card to my niece who needed a little cheering up this week due to an emergency surgery. She is fine and recovering well now.

Thursday, April 22, 2010
Copics Candy! Edited to fix my error!!!

Just a reminder that it isn't too late to get in on my first challenge at Sundays With Crissy! Pictured above is the blog candy I am offering to one lucky participant, who enters the challenge using one of my digital images from either Squigglefly, or Whimsy Stamps! Deadline is midnight on Saturday EST. Visit my challenge blog for all the details.
EDITED TO ADD:
Ooooops! I forgot this candy runs for FOUR weeks, and includes participants in my second challenge which will be posted on Sun. April 25!! Contest closes Saturday, May 8 at midnight EST. Winner will be announced Sunday May 9th along with my third challenge. Sorry peeps, excitement clouded memory for a second!
It is also not too late to try out to be on my design team, Crissy's Crew! Deadline for applicants is April 30 midnight EST. Click here for a list of all the requirements.
And
I couldn't help but share this pic of my first and only grandchild. Cuteness beyond cuteness. :-D

Monday, April 12, 2010
Whimsy Blog Hop -- Digital Release!

Welcome to Whimsy's Blog Hop for their first ever Digital Release! I am the first stop on the hop today! The hop runs all week and ends at noon on Friday April 16th! So you have lots of time to check out all the Whimsy Design Team blogs and get a chance to win the blog candy as well! It will include images from the new release of course!
Whimsy is releasing four images from me, as well as a couple of super cute images from Katie, some really cool sentiments from Ann, and also some images from Whimsy's previous rubber stamp collection, now available in digital format! Each download contains a zip file with three versions of the image; JPEG, TIFF and PNG. Images can be flipped, rotated, and resized to fit your crafting needs. And of course you won't have to wait for Mr. Postman to bring you the images. Then there's also the savings $$ because digital images cost less than rubber. Sounds tempting, doesn't it!!
I saw this card by Lisa and I got really inspired to make one similar to it. It isn't an exact CASE, but pretty close! I coloured my new digi image, "Gift Horse" with the following Copics:
Saddle: B32, 34, 37, 39
Saddle blanket, cinch, and gift: R14, 17, 27
Gift bow, ribbon: Y28 and gold stickles
Ground: C0, 2, 4
Horse's body: E51, 55, 57
Hooves: E55, 57, 59
Mane and tail: E55, 57, 59, 49
E41 on the rope
E95 in his ear
The star was hand cut. I know it ain't perfect, but it wasn't easy to do either. Guess I could use a star template on my wish list. :-)
I have entered this card in the following challenges:
Dare You 2 Digi - metal
Stamp, Scrap & Doodle - birthday card
ABC Challenge - R is for red
NEXT STOP ON THE HOP, the lovely and talented: ANN
Have fun peeps!
Blessings!
P.S. Just started a new challenge blog, if you're interested! And, I'm looking for a Design Team! Check out this link for details!

Sunday, April 11, 2010
Whimsy Sneak Peek!

Hi Folks!
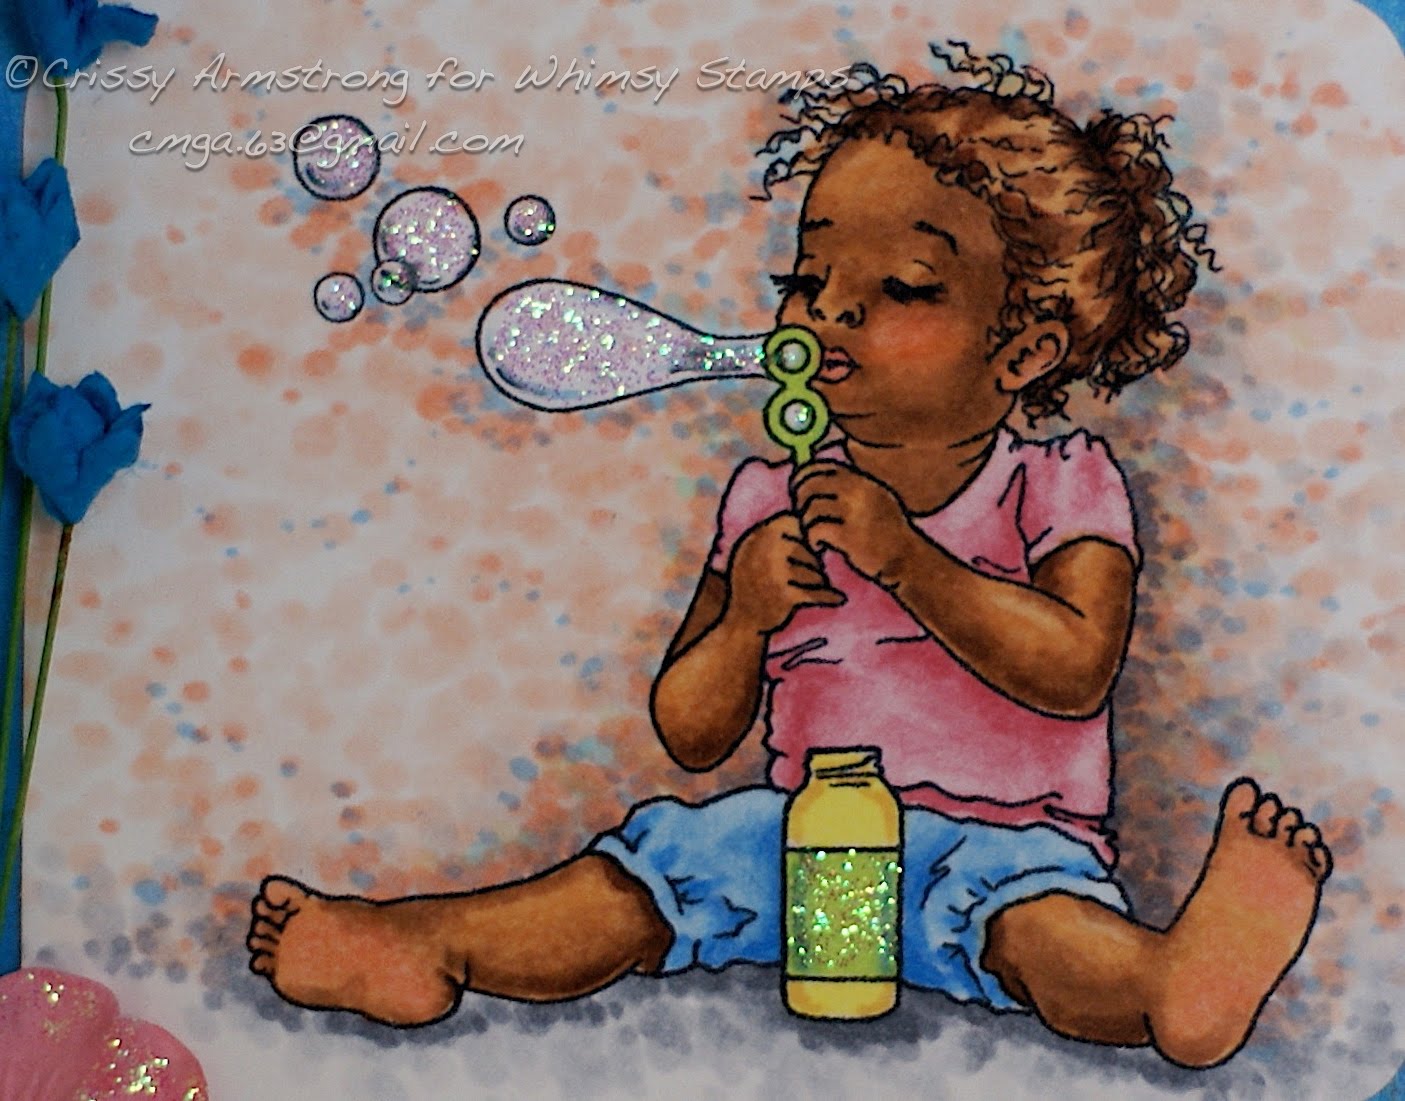
I just wanted to share the card I made with Maya Blowing Bubbles! She is one of four new digital images I drew for Whimsy Stamps! They are coming out with an exciting digital line with new art from all their contributing artists! All the new digi images will be ready to purchase and download starting Monday April 12. And of course as usual there will be a blog hop with wonderful prizes to be won, so come back tomorrow for that!
This card is my first sample that I am showcasing on my brand new challenge blog, Sundays With Crissy! My first challenge is easy peasy. I call it, "Make it a combo" (combine challenges or papers, embellishments, whatever!) I have FIFTEEN COPIC CAIO markers to give away to one lucky participant! I hope you follow the link and go see what my very first challenge is all about! Enter as many times as you wish to increase your chances of winning! I sure hope you can join in the fun. See my challenge blog for details!
In case you weren't here earlier in the week, I posted a couple of new videos showing how I coloured Maya, and added the dotty background. Ashley helped to film it and add the comic relief. :-D Just scroll down a couple posts if you'd like to see them. Copic colour list is also in that post.
Don't forget, I am still accepting applications for Crissy's Crew, my DT for Sundays with Crissy! Follow the link on the sidebar for details.
Thanks for coming by for a visit today! God bless you!
Saturday, April 10, 2010
Winner of Name The Tigers!
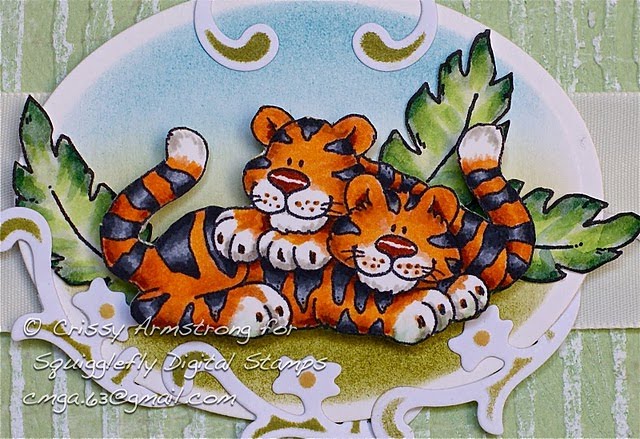
We have a winner! I have looked over all the name suggestions for my "Tiger Friends" image at Squigglefly, and as soon as I saw Sarah's, it was instant love. Here is what she said:
 Sarah said...

Sarah said...So many good names already, but my 3 year old daughter wants to call them Tippy & Tike. When I asked her why "because that is what they are called" - enough for me. Sarah x
Sarah, you can tell your 3 yr old daughter that I totally agree with her. That is what they are called! Congratulations, Sarah, you and your daughter have won the image and the card I made with it! Please contact me with your mailing address and e-mail address, and I will get your prizes to you! Thank you for playing!
So here they are, newly named: Tippy and Tike!
Wednesday, April 7, 2010
Sneak Peek and New Videos!
I am really happy to present to you one of my brand new digital images for Whimsy Stamps! It is a peek at what is to come. Whimsy opens up their brand new digital line of images on Monday April 12th so stay tuned! Of course that means blog hop time is coming, with a chance for prizes too, so be sure to pop back for that this coming Monday!
You may have met or at least seen Tracy Gordon in blogland. She is an avid commenter, always lifting folks up with her praises of their work. And she has her own blog where she shows off her own hand made cards and layouts, as well as showing the occasional picture of her darling daughter, Maya.
I approached Tracey a little while ago to ask if I could possibly borrow some photos of her super cute daughter Maya so that I could draw her. She graciously agreed! So here is my first rendition of her precious child, Maya Blowing Bubbles!

You may have met or at least seen Tracy Gordon in blogland. She is an avid commenter, always lifting folks up with her praises of their work. And she has her own blog where she shows off her own hand made cards and layouts, as well as showing the occasional picture of her darling daughter, Maya.
I approached Tracey a little while ago to ask if I could possibly borrow some photos of her super cute daughter Maya so that I could draw her. She graciously agreed! So here is my first rendition of her precious child, Maya Blowing Bubbles!

I have a video presentation for you as well. Actually two of them! Daughter Ashley was my film-maker again, and she was cuttin' up as usual! In the first video I show how I coloured Maya's dark complexion. The second video features my technique for how I do the dotty backgrounds. You may notice that I added a few more dots onto the picture after I finished the video. There were no grey or blue dots on the upper portion of the drawing. I decided to add them in because there was not enough contrast between the dotted background and her pink shirt. That's the great thing about these type of backgrounds. You can always add more dots and alter the colours; at least you can go darker. It is possible to go lighter too using the blender pen to remove some colour, but that takes a lot of time and patience!
The first video is about six minutes, the second around four. Enjoy!
If you have trouble seeing them on this blog, you can go directly to the YouTube site and watch the first one HERE. The second one is HERE.
Monday, April 5, 2010
Name These Tigers!

I'm holding a "Name the Tigers" contest for this image I did for Squigglefly! The winner will get this card plus the digital image which is currently called "Tiger Friends" (sorry, no substitutes!) Just think of two names that you might find fitting for this pair of tigers and let me know in your comment below. You can try as many times as you like! I'll leave it open until Saturday April 10th!

I coloured the tigers with the following Copics:
Stripes: C3, 6, 9, and 10
E95, 97, 99 and then Y38 all over that
E19 on their noses
W3 and 4 for shadows in white areas
The jungle leaves are my old High Hopes design that I stamped, cut out, and painted with water colours. Then I beefed up the colour using G40 and 82 and YG67
It's funny how I now find it hard to leave a water colour as is; after using Copics so much, I feel water colours look too dull and washed out by comparison. hmmmmmm
I used the Cuttlebug embossing folder twice to do the green panel, and sanded it with rough sand paper to show the white core. The stitches are fake (well obviously). I used the Scor Pal with the little hole making tool and then painted the stitches on with Copic White paint (love that stuff!).
I've used Large Oval and Floral Accent dies from Spellbinders, and sponged on the ink colours while they were still in the dies.
I used two layers of foam tape on the tigers and one layer of foam tape on the oval to pop them up.
Thanks for stopping by for a visit! I hope you have a blessed day filled with the knowledge that you are loved by God! He lovingly watches over you!
Saturday, March 27, 2010
Growth Part 2

Thanks for the lovely responses to my post titled, "Growth" (one post below this one). It was fun to take a look back at one of my first cards and to share it with you. The first commenter, Angela suggested it would be cool to see how I do this same image now. So I did just that! Thanks for the suggestion, Angela! There is a we bit of a difference :-D

Now I looked at what challenges would help inspire me to make this card, and I have included the following:
Creative Card Crew - "Going Dotty". I put polka dots on the framing layer and on the sentiment tag.
Papertake Weekly - I used their sketch
Pile it On - "Furry Friends" (well that is obvious, lol)
and Stamp Something - they wanted us to doodle. I doodled the polka dots with a couple of brown Copic markers
I used the following Copics on the High Hopes image, Roasting Marshmallows:
Choppers Beaver: E41, 44, 47, then E21 all over as a general "wash"
Mudzie Moose: E70, 74, 77 on body, then E11 as a "wash" over that
Bear: E50, 53, 55. 57. 59, R81, 83
Tinks Skunk: C1, 4, 6 9, R81, 83, B41, Opaque White by Copic
Log: E11, 13, 15, 17, 19, E49, W4
Grass: G14, 21 24, 40, BG75, 78
Flames: Y17, R08, Y11
R81 and 83 on feet pads, inside ears and on marshmallow bag
Background: E50, R00, RV00
Thanks for taking a peek at what I did today! Bless you!
Thursday, March 25, 2010
Growth
Hi Peeps!
I have a little something different to share with you today, hope it interests you.
I get a lot of compliments on how I colour up an image - thank you very much to those who say so! In fact thank you to all who have left nice comments!
But I have not always coloured the way I do today. And I'm not speaking of my kindergarten days either! For many years, I considered myself an artist because I loved to draw with a pencil or pen. But even though I could always draw well, I did not know the first thing about colour and how to apply it, or what colours worked well together. Most of my art was in black and white -- for years!
I started drawing images for High Hopes back in 2005. These were large open images that begged for some colour to bring them to life. I wanted to colour them up and make cards with them. But I was stumped! I did not know what to do!
I struggled SO much for that first year or two. I tried markers and coloured pencils and water colour paint. No matter what I tried, I struggled!
For the first year or more, this was my routine: Stamp off an image one DOZEN times. Start colouring the first one. Chuck it out. The second. Chuck. The third. Chuck again. I would be so unhappy with my colouring that usually the first ten or eleven would go to CHUCK! And let me tell you, Chuck wasn't giving me any compliments for the job I did either! LOL
Now I am going to show you one of the first cards I ever made with one of the first images I ever drew for High Hopes Rubber Stamps. (gulp, swallows pride) No, my grandchild did not colour this. I did. Keep in mind this was the copy I felt was good enough to make into a card. All ten or twelve of my previous tries had gone to chuck.

Now I am not saying this is terrible. I'm just saying, I have grown. And we all do grow, as artists and card makers. If you are constantly making cards, week after week, you cannot help but grow and improve your skills. It is bound to happen, just for the sheer repetition and practice you are doing!
I am posting this because I want to encourage anybody who thinks they can't learn to colour well. If a colour challenged artist like me can do it, so can you. All it takes is the determination to keep colouring, ask questions, study your mentor's work, and keep your mind open to learn new things.
I used to go to the gallery of an artist who I thought could colour really well, click on one of their cards, and put it up nice and big on my computer screen. Then I would stare at it and study it for a long time. I would keep it up on my screen, and then go and try to mimic what I saw. This exercise really helped me a lot! There were two galleries that I studied more than anyone else's: Jerri Kay and Anna Wight. You can see that even they have grown, if you go back to their galleries on SCS and look at what they did at first too.
I picked their brains about their art work on more than one occasion and made friends with them in the process. And I am happy to say that they are still dear friends to me. Hugs to you Anna and Jerri!! xo I still bow in your general direction!! ;-)
If you have stayed with me til the end, bless you and thank you for taking the time to read my post.
I hope you were encouraged to keep growing as artists!
Hugs,
Crissy
I have a little something different to share with you today, hope it interests you.
I get a lot of compliments on how I colour up an image - thank you very much to those who say so! In fact thank you to all who have left nice comments!
But I have not always coloured the way I do today. And I'm not speaking of my kindergarten days either! For many years, I considered myself an artist because I loved to draw with a pencil or pen. But even though I could always draw well, I did not know the first thing about colour and how to apply it, or what colours worked well together. Most of my art was in black and white -- for years!
I started drawing images for High Hopes back in 2005. These were large open images that begged for some colour to bring them to life. I wanted to colour them up and make cards with them. But I was stumped! I did not know what to do!
I struggled SO much for that first year or two. I tried markers and coloured pencils and water colour paint. No matter what I tried, I struggled!
For the first year or more, this was my routine: Stamp off an image one DOZEN times. Start colouring the first one. Chuck it out. The second. Chuck. The third. Chuck again. I would be so unhappy with my colouring that usually the first ten or eleven would go to CHUCK! And let me tell you, Chuck wasn't giving me any compliments for the job I did either! LOL
Now I am going to show you one of the first cards I ever made with one of the first images I ever drew for High Hopes Rubber Stamps. (gulp, swallows pride) No, my grandchild did not colour this. I did. Keep in mind this was the copy I felt was good enough to make into a card. All ten or twelve of my previous tries had gone to chuck.

Now I am not saying this is terrible. I'm just saying, I have grown. And we all do grow, as artists and card makers. If you are constantly making cards, week after week, you cannot help but grow and improve your skills. It is bound to happen, just for the sheer repetition and practice you are doing!
I am posting this because I want to encourage anybody who thinks they can't learn to colour well. If a colour challenged artist like me can do it, so can you. All it takes is the determination to keep colouring, ask questions, study your mentor's work, and keep your mind open to learn new things.
I used to go to the gallery of an artist who I thought could colour really well, click on one of their cards, and put it up nice and big on my computer screen. Then I would stare at it and study it for a long time. I would keep it up on my screen, and then go and try to mimic what I saw. This exercise really helped me a lot! There were two galleries that I studied more than anyone else's: Jerri Kay and Anna Wight. You can see that even they have grown, if you go back to their galleries on SCS and look at what they did at first too.
I picked their brains about their art work on more than one occasion and made friends with them in the process. And I am happy to say that they are still dear friends to me. Hugs to you Anna and Jerri!! xo I still bow in your general direction!! ;-)
If you have stayed with me til the end, bless you and thank you for taking the time to read my post.
I hope you were encouraged to keep growing as artists!
Hugs,
Crissy
Bubba Fish

Sorry about blinding everybody today ;-)
This is Bubba Fish and he is another one of my Squigglefly images.
I don't usually do cards this bright, but the theme just seemed to call for it. I coloured Bubba with Copics in some very bright colours (no duh!) but since I did it some months ago, I don't have a list! Sorry! But the background water was really fun to do and is my favourite thing about this card! After applying several shades of blue and turquoise, I then used the colourless blender to "pool" the colours (no pun intended). This works really well when you have laid down a good thick layer of medium to dark shades. I love how it gave me a nice water effect! The tip for the water look is to vary the size of the pool you make with the blender pen. Using the brush tip, if you push it down onto the paper and hold it still, when you lift it, you will see the rough outline of the brush tip which ends up looking like a petal shape. But if while you are pushing the tip onto the paper, you roll it back and forth or go around in a circle, you will get different shapes. That is what I did here. And even for a few of these "pools" I rubbed the tip of the blender over an area roughly the size of your pinkie nail. (sorry, can't think of a better comparison at the mo) That way I was able to get some larger pools.
Don your sunglasses, this is pretty bright!!!!

I got inspired by several challenges and here they are:
Fab n Funky - It's all in the technique. They want us to use our fav. technique. Mine has to be using the blender pen with Copic markers to create interesting textures, such as I did for the water!
Creative Belli Blog: The sketch is from this blog, and they want us to add a clip. Thus the star clips on the sentiment oval.
Pixie Cottage - They want us to use circles. Well, the bubbles and polka dots are circles!
Stampin' Royalty - Glitter Happy! Thankfully this time the glitter showed in my photo (on the bubbles!)
Be sure to check out my new challenge blog, Sundays with Crissy! I'll have the first challenge on Sunday April 11th. And I am going to need a Design Team to help me with it, so I am holding try outs!! So if you are interested, click here for the application details!
Wednesday, March 24, 2010
Snuzzle Love

I am happy to show you one of my more recent images released with Wags 'n Whiskers. This one is called, "Snuzzle Love" and depicts Zoe with her famous bunny that she so lovingly took care of as a young child. It is precious when our childrens imaginations allow them to make friends with a stuffed toy. I hope I captured that innocent child-like love with this image I did for Nikki and Lacey.
Here is a list of Copics used:
B41, 45, 60
BG11, 13, 75
R21, 81, 85, 0000
E50, 51, 53, 55, 57, 59
E00, 000, 11
E70, 71, 74, 77
Blender 0
As usual, I did change my mind about her pants after I did them all in brown. I went over them with the R80's to make them more pinkish maroon.
Some of the E50's were on the floor to make a wood like appearance.

I got inspired by the following challenges today:
Friday Sketchers #94 was the sketch I used, and Claudia's sample card was my inspiration!
Stamp Something - distressing
Charisma Cardz Challenges - something for the kids
One Stop Craft Challenge - let it shine (hard to see, but I added stickles to the bunny's bows, plus the rhinestones add some shine too!)
Ooh La La - A button, a bow and some bling!
Stampin n Scrappin - Flowers and stitching
Don't forget, I am looking for a Design Team for my new Challenge blog, Sundays With Crissy! Click the link for details on how to apply!
Subscribe to:
Posts (Atom)



 Posts