Saturday, August 29, 2009

North Woods Stack


I have to admit that I totally CASE'd one of my favorite artists' cards, the amazing Miss Anna Wight! I love her simple yet stunning cards. She wow's me everytime!
I wanted a simple masculine style of card for my FIL who turns 80 this month! I hope he likes it!!
I watercolored the image using Twinkling H20's, and sponged Vintage Photo Distress Ink along the edges for a cool effect.
I made the bg paper myself and I love how it turned out! I used canvas paper and just swiped it with various dye ink pads. When the ink was dry, I used a bottle top to "stamp" circles all over it with an off-white colored acrylic paint. In other words, I just had fun! No rhyme or reason. Just random color and random dots. Sometimes I gotta let the inner child out to play!!
You can find this High Hopes Stamp at Bunny Zoe's Crafts in England, Scrappin' Great Deals in Canada, among other stores that carry HH's (check out the list on the right side bar).
Thanks for looking today!

Wednesday, August 26, 2009

Checking in...

Hello Precious People!
I have been kind of MIA as of late. Summer is always a busy time what with traveling and making the most of sunny days. We went to Ottawa recently where my son Nik and his wife Alla reside. I got to see her growing "baby bump"... YEEEHAAAAW! I'm gonna be "GRANNY CRISSY" in a few months!!!!!
Also, I have a few creative projects "in the works" that I am so excited about, but for now it's a secret (shhhhhhhh!!!) and I can't share them just yet!
I am hoping I'll have time soon to make some more cards and videos to share with you.
In the meantime, God bless you and enjoy what's left of summer!
Hugs to all,
Crissy

Sunday, August 16, 2009

Stackable Santa


I love this Stackable Santa that I drew for High Hopes while I was still working for them! I stamped him on 140 lb. cold press water color paper by Canson using Versafine Onyx Black ink. I colored him with Twinkling H20 paints (which I LOVE).
I added Stickles on his belt buckle and clear Spica glitter on the ribbon of the gifts (doesn't show at all in the photo).
I did the sketch myself (I'm sketch challenged usually) and I think its all right!
I hand printed the saying on the Spellbinders tag.
I know for sure you can find this Santa here or here and I have put a new link box on my sidebar (under my profile) with all the (known to me) places where you can order High Hopes Stamps.


Have a great day and God bless you!

Tuesday, August 11, 2009

Copic Video Tutorial: An Irish Hat!


Well here's another video on Copic techniques I hope you will enjoy! I always have a great time doing these demos!
Let me know what you think, or if you have any questions, don't hesitate to ask!
Bless you!

Monday, August 10, 2009

Announcement: Leaving High Hopes

I want to announce to all who are interested that I have ended my contract with High Hopes Stamps and will no longer be illustrating for them. It was not an easy decision to make, as I have been with them since spring, 2005. I really don't want to stop sharing my stamp illustrations with you, and I hope I can continue in some form.

I do not know what Tina and Bethany have planned, so I would kindly ask that you direct any questions about High Hopes to them at their e-mail address here: highhopesstamps@gmail.com and speak to Bethany.

I have the highest regard for the High Hopes family and have enjoyed the time we shared working together. Drawing for them these four years has given me so many things that I treasure; new friendships, insights into the stamping business, and growth as an artist and a leader. For that I will always be grateful.

Thanks to you too, my readers who started off as fans of High Hopes and became my friends! I still plan to do tutorials and share how-to techniques, as I love to do that for you. I know there is a bright future ahead of me in art and I really wish to continue illustrating stamp designs so that I can keep on sharing new images with you.
Chat soon!

Crissy

Thursday, August 6, 2009

Personal Favorite


I did this card just for the pure fun of it! This "American Cowthic" stamp is my personal favorite at the moment and I couldn't help but use it again. You can find it here or here, depending on which side of the pond you live! For a more complete list of stores to order from, go to the HH blog and check the sidebar.
I water colored the image with Twinkling H20's.
The background paisley design was done using Spellbinders Impressabilities. I saturated it with White Craft Ink by SU! and then laid it onto the textured brown cs. Then I took my brayer and brayered overtop of it firmly. I like the effect; it doesn't give a perfect impression, like rubber would, so it looks kind of distressed. And the texture of the paper made it appear like cloth. I think it is cool!
To get the shape of the main image panel, I just drew a curved line at the top and bottom of the image and used scissors to cut along the line I drew. Nothing fancy, nor perfect, but that's what I like; imperfections!
I distressed all the edges with brown dye ink as well as a metal ruler.
I used a hot glue gun to adhere the sides of the scrolls that contain the raffia. Glue dots just wouldn't have been strong enough to hold them.
I made the button with Sculpey.
Here is a close-up if you like:


Thanks for looking today, and God bless you!

Sunday, August 2, 2009

HHC42 Go For The Gold!


Today's challenge is brought to us by our lovely Diva Jeanne! She wants us to use gold somewhere on our card/project. That's easy enough! I used lots of gold: gold brads, gold twine, gold polka dot paper and gold metallic paper. Why not join in the challenge?! You could get lucky and win some blog candy. Check out Jeanne's card on the High Hopes Blog to see which stamps are up for grabs this week. Make sure you post a link to your project on the comment section of the HH blog to get your name entered into the draw!
I stamped Leaping Juliette and the birthday cake in Versafine Onyx Black ink onto 140 lb cold press water color paper by Canson and water colored the images with Twinkling H20's.
I made my bg papers myself! The gold polka dot paper was some tissue paper that I saved. I crinkled it up and placed it overtop freezer paper and ironed it on. The freezer paper has a plastic coating that melts when you iron it so the paper will stick to it.
The purple background page is water color paper that I blotched with several shades of rose and blue to make purple. Then I sprinkled it with salt and splattered it with more purple. It was a fun mess to make!
The gold peeking out on the right side is actually gold wrapping paper that I crinkled and glued onto a piece of scrap cardstock with a glue stick. All home made stuff today!
This is a birthday card for my grown daughter who loves everything purple. In fact, when asked what she wanted for her birthday all she said was "anything purple". Ok so you're getting a card. Just kidding!! ha ha


Thanks for visiting my blog today! You have a blessed day!

Saturday, August 1, 2009

Something different: InStyle Stamps


Mary Giemza, hostess of Copic Creations asked me to join their lovely Design Team this week! It is an amazing blog, with blog candy offered with every challenge! Lots of great companies are sponsoring; go have a look-see if you wish!
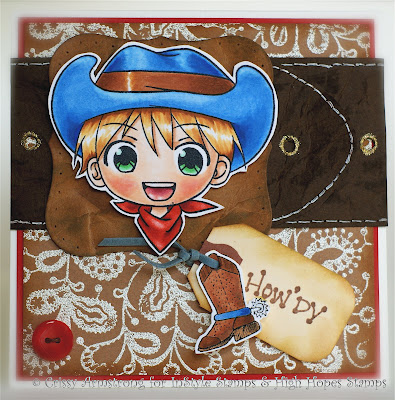
I had to turn down Mary's kind and gracious offer, because there is just enough on my plate right now, but any more would be too much to handle, so I won't be joining the team permanently. However, I was able to do this one card as a guest for challenge number nine, sponsored by InStyle stamps! For this challenge, we are showing how to color eyes Anime style.
The cute cowboy from InStyle Stamps is named Tommy. The boot and saying are from High Hopes Stamps. I used Spellbinders Impressabilities for the paisley bg paper! I love how it worked! I just inked it up with White Kraft Ink and laid it down on the brown cs. Then I took my big brayer and rolled it overtop (with a sheet of printer paper overtop). I used white embossing powder on it and heat set. The impression is not perfect, but I think that adds to it rather than takes away.
I would love to get a Crop-a-dile and some eyelets, but until then, I use my paper drill and gold embossing powder to "fake" it. That's how I did the belt holes! I gave the belt and buckle that leather look by smushing and rolling and crunching the cardstock with my hands until it was very wrinkly. Then I brushed brown dye inks overtop randomly. The faux stitching on the belt is made with a piercing tool and a white gel pen. It took a long time to make this buckle and belt, but I love how it turned out!
Tommy is colored with the following Copics:
Eyes: G05, 02, 00
Skin: E000, 00 11, R20
Hat band: E15, 39,97
Hair: YR21,E15,39
Tongue: R20, 85,89
Bandana: R17,27,59
Blender pen used throughout except on face and hair.


God bless and thanks for looking!