Monday, October 28, 2013

Glorious Pagentry

I am blessed to have some artistic friends in my life.  One of them just started with a line of digital stamps at Whimsy!  I'm so proud to introduce her line of images, "Ashlan Valor Tangles", by Lori St. Clair.  I used her beautiful "Glorious Pagentry" for my card.  The intricate detail is just stunning on all of her drawings.  I really hope you take a minute to go see her first release over at the Whimsy Store.  Her images are unique to her, and are all hand drawn (no computerized curves or lines here, just the delicate, easy flow of her hand).  As soon as I saw the images, I could not wait to get my hands on some so I could explore the possibilities, and make some cards.  This is my second card (if you want to see the first project I did, you'll have to wait til the next Whimsy Inspirations Magazine comes out, because it will be displayed in there!)


I coloured with the following Copics: 
B05, 06, 13, 32, 63, 66
FYG1, FBG2, R20, R22

I'm participating in the following challenges: 


Thank you for visiting today!  I hope you go see what Lori has to offer!

Monday, October 7, 2013

Flash Sale on Rubber!!

Two days only, today and tomorrow (Oc 7 & 8 2013)!  Head on over to Whimsy to get some new Rubbah!!

Monday, September 30, 2013

Good Pony

My sister has a horse ranch and so I thought this card was rather fitting for her on her birthday!  This is "Good Pony", a rubber image I created for Whimsy Stamps.   I made the dark pink paper myself using a black liner marker and a white gel pen on a pink sheet of Basic Grey paper.  The image was coloured with Copics (sorry, no list today).   Those are actual hinges on the left which I created and adhered the two separate pieces of cardstock using brads.  
And, PS - I have another freebie posted on my Facebook page, so if you want to grab it while you can (its being taken down soon!) you'll have to "like" my FB page to get it!! Here's the link to my page: 
https://www.facebook.com/pages/Crissy-Armstrong/133764576783604
Thanks for looking today!

Tuesday, September 10, 2013

50% Off sale on Digi's!!

Hi everyone! I have another card to share with you today, this one is made with "Over The Moon", a digital image I illustrated for Whimsy Stamps.  And what's more, there's a 50% sale today - Tues. Sept 10, 2013 - so get 'em while they're hot! 
I coloured the image with a combination of Copics and coloured pencil.  I'll give you the Copic list, although there is a lot of coloured pencil on top, so I'm not sure how relevant it is.  
Moon: YR30, W2, 4
Clouds: YR30, B000, 12, 14, 16
Cow white areas: YR30, C0, 1, 2, 3, E40, 42
Nose and udder: E93
Brown Spots: E42, 25, 27, 29
Hooves: E40, 42, W5
Bow: R81, 83, 85, BV20, 23, R89
Bell: Y00, 17, 18, YR00, 14, 15, 23, 39, 99
I had fun making the background paper for this one!  I used a sheet of canvas paper, and just went to town on it with my acrylic paints.  Then I roughed it up with an exacto knife to add scratch lines and distressing.  There's lots of texture on this paper!  
I'm joining the following challenges: 

Thanks for visiting today!
God bless!

Sunday, September 8, 2013

Father-in-law's Birthday Card

Copic Colours:
Seagull: W00, 2 4, 5, 6, N1, 3, E40, 43, R20 for blush
Beak and feet: Y32, 35, 38, E97, 99
Water: BG000, 00, 10, 11, 13, B0000, 01, Blender as well as E43 for the post reflection
Hat stripe: B24, 26, 99
Wood post: E23, 25, 29, 43 44, 71, 87, 89

This is a card that I made for my Father-in-law's birthday!  I always find it a challenge to make cards for men - its hard to resist flowers, bows, pearls and lacy things! I used my Mr. Gullible rubber stamp image I illustrated for Whimsy Stamps.  
I'm entering it into the following challenges:
Fab n' Funky: Opposites Attract (opposite colours - mine are orange and blue)
Stamp and Create: Birthday (this is a birthday card for my FIL)
Our Creative Corner: Forgotten Things - I haven't used my embossing folders in ages!

Thanks for stopping by! 
God bless you!


Friday, August 30, 2013

Freebie Digi!!

I have another freebie digi available, and if you head on over to my Crissy Armstrong Facebook page, you'll find the link for it!!
Here's a peek at the image:

Tuesday, August 20, 2013

Free Images

I'm starting up a new thing - for a limited time, I'll be giving some free images away on my Facebook page, so you gotta go there to find the link!  I hope to do this periodically, so join me on FB and keep your eyes peeled!
Happy creating, everyone!!

Thursday, August 1, 2013

I'm A Make It Crafty Guest Designer!


Hi folks!  This is a departure from my usual m.o. as I'm sure you have guessed already.  On Facebook not long ago,  Zoe of (Make It Crafty) posted that she was looking for some guest designers for her next release, and I was intrigued.  Then I found out this release was special because it was on her store's 3rd birthday so it was going to be a big bash.  Well that did it, I wanted to be invited to the party!  So you can imagine my delight when she opened the doors up for me and a special group of MIC fans who signed up before the deadline (early bird gets the worm, and all that). So...
Welcome to the very special Make it Crafty Tea Party!
Today, I'm joining the fun with a collection of Make it Crafty fans from around the world, serving you a delicious array of crafty delights to celebrate not only the magical release of Alice in Wonderland but also Make it Crafty's THIRD Birthday!!
What better way to celebrate than a tea party full of Make it Crafty fans?
As you chase the white rabbit down holes, through small doors, around corners and more, keep your eye out for hidden letters, collecting them along the way. Simply decipher the question and then enter the answer at the end of the hop for a chance to win the grand prize!
It wouldn't be a fun tea party without hidden prizes along the way, so make sure you comment as you chase the rabbit for a chance to win more prizes!
------------------------------------------------------------------
Hopefully you've found your way through the door from KAT, but if you've just fallen down the hole then you might want to start back at ZOE.
------------------------------------------------------------------
The guests were given the option to play with 6 images from the new collection and I chose to get creative with "Alice And The White Rabbit".
I challenged myself with this image, not only because it is a departure from my usual style of much simpler designs, but also I printed it in "watermark" mode (Word program) so that the lines would be a very light grey and hard to see.  Did it challenge me? Oh yes it did!  Thankfully I have heavy duty magnifier lenses which never left my face the whole time!  Some call this the "no lines" method of colouring.  I think my lines were a medium grey so I am not sure it counts as such.  I've seen other people's "no lines" colouring and you really don't see the lines at all, once they are done.  Maybe next time, I'll choose an even lighter ink, if I feel like stretching my boundaries that much more! 
I coloured this image with mixed media, starting with a base of Copics.  Here is a list of the Copic colours, although I did cover over a good deal of those with Prismacolour pencils and a handful of pastel pencils as well to get this look: 
Hair: E50, 51, 53, 43, 44, BV00, BV20
Skin: E0000, 000, 01, BV20, R20
White areas: C00, 01, 02, 03, BV20, E40
Blue dress: BG11, 01, 53, 57
Shoes: E13, 15, 18, 19
Red coat: R32, 35, 37, 59
Tie: FYG2, V15
Top hat: C0, 01, 02, 03, 05, 07, B21, B34, B39
Background is Prismacolour pencil burnished with white.
Some people use a blending stump to blend coloured pencil.  I prefer to burnish over it with a white or light coloured pencil crayon.  I find it blends better and I have more control. 
I made the sentiment on the computer as well as the little playing cards and row of hearts, which came from a free share file (the hearts and cards did, not the saying). 
Blue and green background panels stamped with Lavish Flourishes from Whimsy.  I thought this would make a great belated birthday card, although having one on hand and ready to go is a bit ironic.  Maybe I'll just have to be late on someone's birthday on purpose in order to give it out.  ;-) 

The fun doesn't stop here and if you head through this door you'll find your way to ALYCE.  (Isn't that cool, we actually have an Alyce on the hop list!!)
Thanks for coming by today!
God bless you!!


Saturday, July 27, 2013

Winnifred Whale

Here is one of my digi images, Winnefred Whale in all her glory (from Whimsy Stamps).  Doesn't she look like she wants to be your friend? She can be, and you can play with her for all of 3 US dollars!  :-)  She also comes with a couple of sayings too - "Whale, wha'da'ya know!" and "Hope you catch a big one!"
I made this card to thank Zoe for sending me a gift.  If you haven't seen Zoe's store, "Make It Crafty" you really are missing out.  She has a ton of magical, whimsical images to choose from.
I made the "tons of thanks" sentiment on my computer. 
Country Heart Die also from Whimsy. Chipboard corners from Make It Crafty but discontinued.
Here is your close-up.
Copic list: 
B0000, 000
BG23, 32, 34, 45, 49
BV20, 23, 25, 29
And lots of use of 0, the blender pen
Thanks for stopping by today!

Friday, July 26, 2013

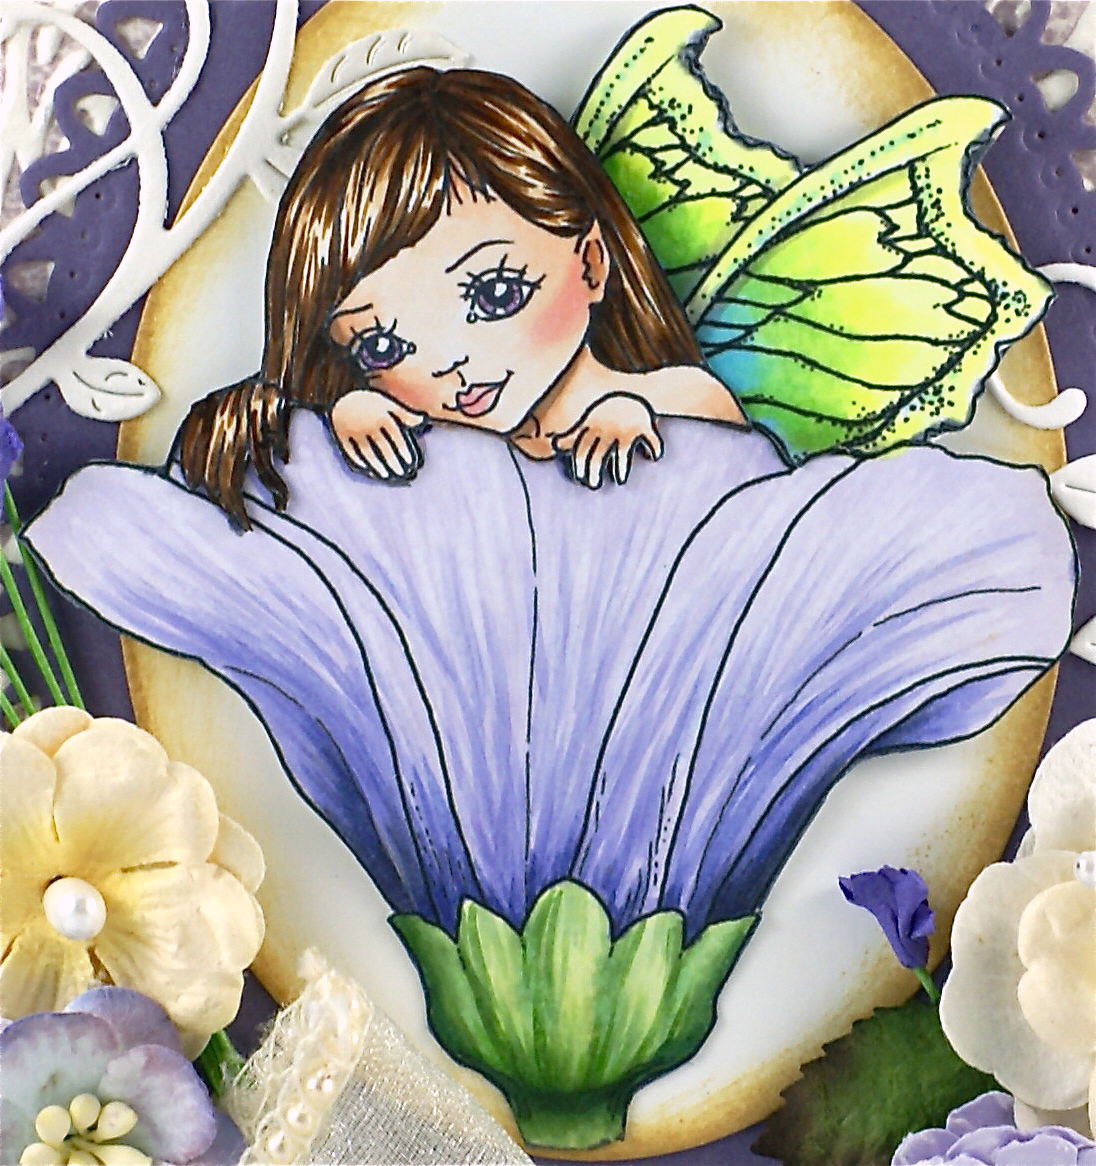
Fairy Daydreams

I was totally inspired for this card, and practically copied the layout of this stunning beauty of Mariska's right HERE. Please take a moment to go look at hers - it made my jaw drop!  On my card I used my Fairy Daydreams image for Whimsy.  I made some videos of my colouring on this image from start to finish.  Find the first three HERE and the final one HERE. You can find all my colouring videos in the tabs at the top of this page (just under the banner).
  I tried Mariska's method of popping out portions of the image, but I didn't care for how my attempt turned out! So I re-coloured the fairy and cut her out a second time, and laid it overtop of the one that I botched.  It was not easy cutting around her fingers (twice)!! 
Here is a side view to show how the image is lifted off the page.  I glued the flower part down at the stem so it actually angles outward from the bottom up. But the fairy and the wings are also cut out, making 3 parts that I glued on separately.
I made my own panels using Cuttlebug folders and Distress ink.  I inked up the folder before I put it in the machine.  I love how it turned out and will be trying this method again. The sentiment, which is only half of it, was done by my Bestie Kathryne of Stampart Designs, also for Whimsy.  Inside I put the other half to complete the sentence "its your birthday".   This came from a set of fairy sentiments that she gave away on her Freebie Tuesday giveaway on Facebook.  Thank you Kathryne! Also one of the purple flowers was a gift from fellow card maker friend Brenda Snider.  Thanks Brenda!
Die cuts by Whimsy Shapeology (Tab and Vines) and Spellbinders (ovals).
I stamped Lavish Flourishes also by Whimsy, on the front of the card base.
Here is your closeup and Copic List: 
Wings: FYG1, FYG2, B01, C3
Skin: E000, 01, 13, C3, R20, 21
Petals: BV000, 02, 04, N3, 5, 6, 0Blender
Hair: E50, 53, 57, 59, W7
Stem: G20, 21, 24, 28, C5
Thank you for coming by today! Bless you!

Thursday, July 25, 2013

Flourish Tree

Hi Peeps! 
Here is a card I made using my Flourish Tree and the poem I wrote to go with it.  I made this for another Bestie (I am sooo lucky to have more than one!) in her favourite colour - spring green.  I wish I had taken a side view because it would show all the work I did to pop out the flowers.  I cut out some extra blooms from the scraps of paper, and some of them I just exacto cut a portion of them so that I could make a slit to insert the edge of the poem panel.  Even though there is virtually no colouring, the cutting took a long time, esp. the careful cutting I had to do on the flowers that I tucked the panel into. I didn't have any colouring to do - so something had to take a long time, right?! ha ha
Thanks for visiting today!  God bless!!

Tuesday, July 23, 2013

Raggedy Girl - Adorably Yours: Stampart Design by Kathryne

Hi Chilluns! This is a card I made using Stampart Design by Kathryne's digi stamp, Raggedy Girl - Adorably Yours for Whimsy Stamps.  I gave this to Kathryne for her birthday.  She is one of my bestest besties and has been for many years.  I love her images and only wish I had time to use more of them. We are both basically still kids at heart, and our images reflect that.  I adored the Raggedy Ann and Andy story books when I was young.  Her series of Raggedy images bring back fond memories of reading those imaginative stories.  If you want to check out her line (she has lots more than Raggedy dolls - quite a variety actually), go HERE.
I love the Cottage Charms designer paper, also found at Whimsy Stamps. It has a few lined sheets, like the one I used on the inside.  Perfect for writing out a personal greeting.
Other stamps:
Party Hat Sentiments
Vintage Fancy Corners
Fanciful Birthday Notables 1
Eblellies:
Two Tone Pale Pink Rose Bouquet (which I coloured with Copics)
Accent Leaves

I put so many embellies on the front of cards, it can make them front-heavy and sometimes they will topple. So I used one of the designer papers for the back of the card too.  It just completes the card so much, plus it balances out the weight of the card so it doesn't tip forward.    It looks more beautiful to decorate the back anyhow.
Here is your close-up.  Copic colours listed below. 
Copics used:
Reds: R12, 14, 17, 20, 21, 27 Shaded with C3, 5, and 7
Greens: BG11, 13, 15
Whites: BV20, 23, C1, C3, 5
Indigo shoes: B34, 37, C3, 5, 9
Face E000, 00, 01, 11, R20, 21
Copic white used on shoes and face for highlights
Blue background drawn with Prismacolour Pencil
Thanks for visiting today! 
God bless!!